3.7.10 Lab – Use Wireshark to View Network Traffic (Answers)
Objectives
Part 1: Using Wireshark to Capture and Analyze Local ICMP Data
Part 2: Using Wireshark to Capture and Analyze Remote ICMP Data
Context / Scenario
Wireshark is a protocol analyzer software tool, sometimes known as a "packet sniffer," that is used for network troubleshooting, analysis, software and protocol development, and teaching. As data streams traverse the network, the sniffer "captures" each protocol data unit (PDU) and is able to decode and analyse its contents in accordance with the relevant RFC or other standard.
Wireshark is an essential tool for anybody who works with networks and may be used in conjunction with the majority of the labs in the CCNA courses for data analysis and troubleshooting. Wireshark will be used to collect ICMP data packet IP addresses and Ethernet frame MAC addresses in this experiment.
Ressources Required
1 personal computer (Windows with internet access)
Additional personal computers (PCs) connected to a local area network (LAN) will be utilised to respond to ping queries.
Note from the instructor: This lab requires that the student is using a computer with internet connectivity that is capable of pinging other computers on the local area network.
Using a packet sniffer such as Wireshark may be seen as a violation of the school's security policy. Permission should be sought prior to running Wireshark for this lab. If the teacher has reservations about utilising a packet sniffer such as Wireshark, he or she may opt to assign the lab as homework or provide a walk-through session.
Instructions
Part 1: Using Wireshark to Capture and Analyze Local ICMP Data
In Part 1 of this lab, you will ping another PC on the local area network and use Wireshark to collect ICMP requests and responses. Additionally, you will examine the collected frames for particular information. This investigation should contribute to a better understanding of how packet headers are utilised to transmit data to their intended destination.
Step 1: Obtain the IP addresses of your computer's interfaces.
For this lab, you will need to determine your computer's IP address and the physical address of its network interface card (NIC), commonly known as the MAC address.
a. In a command prompt window, type ipconfig /all to get the IP address, description, and MAC (physical) address of your PC's interface.
C:\Users\Student> ipconfig /all

Windows IP Configuration

   Host Name . . . . . . . . . . . . : DESKTOP-NB48BTC
   Primary Dns Suffix  . . . . . . . :
   Node Type . . . . . . . . . . . . : Hybrid
   IP Routing Enabled. . . . . . . . : No
   WINS Proxy Enabled. . . . . . . . : No

Ethernet adapter Ethernet:

   Connection-specific DNS Suffix  . :
   Description . . . . . . . . . . . : Intel(R) 82577LM Gigabit Network Connection
   Physical Address. . . . . . . . . :00-26-B9-DD-00-91
   DHCP Enabled. . . . . . . . . . . : No
   Autoconfiguration Enabled . . . . : Yes
   Link-local IPv6 Address . . . . . : fe80::d809:d939:110f:1b7f%20(Preferred)
   IPv4 Address. . . . . . . . . . . : 192.168.1.147(Preferred)
   Subnet Mask . . . . . . . . . . . : 255.255.255.0
   Default Gateway . . . . . . . . . : 192.168.1.1

<output omitted>
b. Inquire of a team member or team members for their computer's IP address and supply them with your computer's IP address. At this moment, do not furnish them with your MAC address.
Step 2: Launch Wireshark and begin data collection.
a. Open Wireshark. To initiate the packet capture, double-click the appropriate interface. Ascertain that the selected interface receives traffic.
b. In Wireshark, information will begin scrolling down the top area. The data lines will be coloured differently depending on the protocol.
This information may scroll quite fast depending on the nature of the link between your PC and the LAN. We may add a filter to make it simpler to examine and manipulate the data that Wireshark is capturing.
We are just interested in presenting ICMP (ping) PDUs in this lab. To display just ICMP (ping) PDUs, type icmp in the Filter box at the top of Wireshark and hit Enter, or click the Apply button (arrow sign).
c. This filter removes all data from the top pane, but you continue to capture traffic on the interface. Ping the IP address that you obtained from your team member in a command prompt window.
C:\> ping 192.168.1.114

Pinging 192.168.1.114 with 32 bytes of data:
Reply from 192.168.1.114: bytes=32 time<1ms TTL=128
Reply from 192.168.1.114: bytes=32 time<1ms TTL=128
Reply from 192.168.1.114: bytes=32 time<1ms TTL=128
Reply from 192.168.1.114: bytes=32 time<1ms TTL=128

Ping statistics for 192.168.1.114:
    Packets: Sent = 4, Received = 4, Lost = 0 (0% loss),
Approximate round trip times in milli-seconds:
    Minimum = 0ms, Maximum = 0ms, Average = 0ms
Notice that you start seeing data appear in the top window of Wireshark again.Note: If your team member's PC does not respond to your pings, it is possible that the team member's firewall is blocking these queries. For details on how to enable ICMP traffic over a firewall using Windows, please read Appendix A: Allowing ICMP Traffic Through a Firewall. d. Click the Stop Capture button to halt data collection. Step 3: Analyze the data that was collected.
In Step 3, review the data produced by your team member's PC's ping requests. Three parts are presented in the Wireshark data: 1) The top section of the screen displays a list of captured PDU frames along with a summary of the IP packet information contained within; 2) the middle section of the screen displays PDU information for the frame selected in the top section of the screen and categorises captured PDU frames according to their protocol layers; and 3) the bottom section of the screen displays the raw data for each layer. Both hexadecimal and decimal representations of the raw data are available. a. In the top part of Wireshark, click the first ICMP request PDU frames. Take note that the Source column provides the IP address of your PC, while the Destination column contains the IP address of the teammate PC to whom you sent the ping. a. While still selecting this PDU frame in the top section, browse to the centre portion. To examine the destination and source MAC addresses, click the + symbol to the left of the Ethernet II row. Is the source MAC address the same as the one on your PC interface? Yes Does the destination MAC address in Wireshark match the MAC address of a team member? Yes How does your PC receive the MAC address of the pinging PC? ARP is used to retrieve the MAC address. Note that in the above example of a captured ICMP request, the ICMP data is contained inside an IPv4 packet PDU (IPv4 header), which is then encased within an Ethernet II frame PDU (Ethernet II header) for LAN transmission. Part 2: Using Wireshark to Capture and Analyze Remote ICMP Data
In Part 2, you will ping distant hosts (hosts that are not on your local area network) and study the data returned by those pings. You will next analyse what makes this data unique in comparison to the data covered in Part 1. Step 1: Begin data collection on the interface.
a. Restart the data collection process. b. Before beginning another capture, a popup invites you to store the previously collected data. This data is not required to be saved. Without saving, click Continue. c. Ping the following three website URLs from a Windows command prompt while the capture is active: 1) http://www.yahoo.com
2) http://www.cisco.com
3) https://www.google.com Take note that when you ping the URLs mentioned, the Domain Name Server (DNS) converts the URL to an IP address. Take note of the IP address assigned to each URL. d. You may stop the data collection process by clicking the Stop Capture button. Examining and analysing data from distant hosts is the second step.
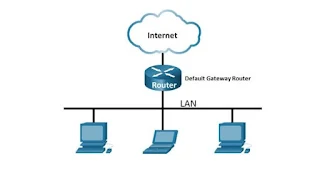
In Wireshark, check the collected data and the IP and MAC addresses of the three destinations you ping. In the space provided, enter the destination IP and MAC addresses for all three locations. www.yahoo.com's IP address is: www.yahoo.com's MAC address is: The following is the IP address for www.cisco.com: The MAC address for www.cisco.com is as follows: www.google.com's IP address is: www.google.com's MAC address is: 98.137.246.7, 96.7.79.147, and 172.217.14.100 are P addresses (these IP addresses may vary) This will be the same address for all three sites. This is the physical address of the router's default-gateway LAN interface. What significance does this information have? All three locations share the same MAC address. What is the difference between this information and the local ping information you obtained in Part 1? Pinging a local host yields the MAC address of the PC's network interface card. When pinging a remote host, the MAC address of the default gateway's LAN interface is returned. Question of Reflection
Why does Wireshark display the real MAC addresses of local hosts but not those of faraway hosts? Because the MAC addresses of remote hosts are unknown on the local network, the default-MAC gateway's address is used. After the packet reaches the default-gateway router, the Layer 2 information is taken from it and a new Layer 2 header containing the next hop router's destination MAC address is added. Allowing ICMP Traffic Through a Firewall, Appendix A
If members of your team are unable to ping your PC, it is possible that the firewall is preventing such requests. This appendix demonstrates how to configure a firewall rule to permit ping queries. Additionally, it discusses how to deactivate the new ICMP rule after the experiment is complete. Part 1: Add a new incoming rule to the firewall that allows ICMP traffic through.
a. Navigate to the Control Panel and, in the Category view, pick the System and Security option. a. Click Windows Defender Firewall or Windows Firewall in the System and Security box. c. Click Advanced options in the left pane of the Windows Defender Firewall or Windows Firewall window. d. In the Advanced Security box, on the left sidebar, click Inbound Rules, and then on the right sidebar, click New Rule... e. This initiates the application of the New Inbound Rule. Select the Custom radio option and click Next on the Rule Type page. f. In the left pane, choose Protocol and Ports and then click Next. Using the Protocol Type drop-down box, pick ICMPv4. g. Confirm that Any IP address is chosen for both the local and distant IP addresses. To proceed, click Next. h. Choose Allow connection. To proceed, click Next. i. This rule is applied to all profiles by default. To proceed, click Next. j. Substitute Allow ICMP Requests for the name of the rule. To proceed, click Finish. This new rule should enable other members of your team to receive ping responses from your PC. Disabling or removing the new ICMP rule in Part 2.
Following the conclusion of the experiment, you may choose to deactivate or even remove the new rule set in Step 1. By selecting the Disable Rule option, you may later re-enable the rule. By deleting the rule, it is removed permanently from the list of inbound rules. a. In the Advanced Security window's left pane, click Inbound Rules and then locate the rule you previously created. a. If desired, right-click the ICMP rule and choose Disable Rule. Additionally, you may pick Erase to permanently delete it. If this is the case, you must recreate the rule to allow ICMP replies.


Comments
Post a Comment